Showing posts with label OBIEE 10g. Show all posts

Wednesday, August 29, 2012

[nQSError: 43023] Number of sessions exceeded the limit.


Oracle Business Intelligence - When a user tries to login, he will get an error called- [nQSError: 43023] Number of sessions exceeded the limit, because the maximum number of users are already logged in. to know more about this error please visit this link - http://obieeblog-jagga.blogspot.in/2012/08/nqserror-43023-number-of-sessions.html.


NQSConfig.ini is a configuration file, where we can configure the OBI Server however we want. MAX_SESSION_LIMIT is a parameter in NQSConfig.ini file to configure the maximum number of session that can be opened at a time. For example, if you set a value 10 to this parameter(MAX_SESSION_LIMIT = 10), then only 10 users can be login. Assume that, 10 users are already logged in, now if any user tries to login then he will get the following error, because the session limit is reached already. The users has to wait until any one of the user(who have logged in) logged out from the session.


To resolve this problem you just follow the below instructions.
Open the NQSConfig.INI file and locate the [ SERVER ] section,  check the number for MAX_SESSION_LIMIT = 1000 ; parameter. (by default this parameter value will be 1000)

If the value for this parameter is less than the number of concurrent users of your application, then increase the number as it should be equal or greater than the number  concurrent users of your application.

If I am wrong, feel free to suggest me please.

Thursday, August 23, 2012

[nQSError: 22040] To use AGO function, the storage level of the query ('[time1.time_key]') must be a static level. (HY000)

This error may occurs most probably due to improper Time dimension hierarchy.
To use AGO or TODATE time series functions, it is recommended that, we should define the detailed level also in the Time dimension hierarchy.

Eg : Suppose you have a time dimension table, that includes columns Time_key, Date_value, Month, Quarter, and Year. And If you have created the Time dimension hierarchy with the levels such as YEAR, QUARTER and Month only (there is no level defined for the column Date_value, which describes the granularity (level of detail)of the row.).
  • This works fine, for drill down, level based measures and to define aggregate tables. 
  • But when you try to use AGO or TODATE function with this Time dimension hierarchy, you will get the above mentioned error.
Solution : Just include one more logical level for the Time dimension hierarchy and add the date_value(or a column which holds granularity for the row.) as a logical key.

Tuesday, August 21, 2012

Maximum Connections Parameter in Connection Pool

This parameter specifies the maximum number of concurrent connections allowed at any point of time. The default value for this parameter is 10.

For each connection pool, you must specify the maximum number of concurrent connections allowed. After this limit is reached, the Oracle BI Server routes all other connection requests to another connection pool or, if no other connection pools exists, the connection request waits until a connection becomes available.
Increasing the allowed number of concurrent connections can potentially increase the load on the underlying database accessed by the connection pool. Test and consult with your DBA to make sure the data source can handle the number of connections specified in the connection pool. 
In addition to the potential load  associated with the database resources, the Oracle BI Server allocates shared memory for each connection upon server startup. This raises the number of connections and increases Oracle BI Server memory usage.
 
Simple Calculation to determine the Max Connections for your Applications
Make sure the “Max Connections” parameter on your connection pools are appropriately set (not too low….not too high!). If in doubt, you can use the following formula which assumes that no more than 4% of your users will ever be logged on and running a report at any one moment:

Max Connections =   Total Users   *   0.04   *    Max Reports on a Dashboard 

So if you have 1000 users and you have no more than 4 reports on any one dashboard, then your  “Max Connections” should be set to 160. 

Note : Max reports on a dashboard includes reports and prompts.

[38087] None of the levels in time Dimension '

For a Time Dimension, it is mandatory that at least one logical level must have set Chronological key. If a chronological key is not set for a Time dimension, then we will get the following error when you check the consistency.

Solution : Expand the Time dimension, go to properties of any logical level, then go to keys tab and check the Chronological Key tab.

Monday, August 20, 2012

Restricting user access to Connection Pool

We can restrict any user from accessing the Connection Pool using the Permission option in Connection Pool.

Just click on the Permission button, then you will get "Permission - Connection Pool " window. By default, this window will show only user Groups. To see users also, check the Show all users/groups option.


For each user and group, you can allow or disallow access privileges for an object by clicking in the check box to toggle among the following options:

  • A check mark indicates that a permission is granted.
  • An X indicates that a permission is denied.
  • An empty check box indicates that a permission has not been modified. 


In the above picture, we can find one user group (Test) and two users (U1,U2). Now, let us deny access to the Group called Test.To deny access, just make the check box cross (X), as shown below.


All the users of that group cant access the connection pool. That is when the user runs a report, then he will get an error like : [nQSError: 19007] The user does not have sufficient privilege to access the database


Note : Assume that,
           you have created two connection pools(eg. CP1 and CP2) for a Data source in the physical layer,
           and you have a user called U1 and you have denied access to the connection Pool C1.
 When a user U1 requests connection, as the user don not have permission to Connection pool C1,
 OBI Server will route the request to the second Connection Pool C2. So, If you want any user to be                     denied to access the underlying data source, remove access to all connection poll, not any single connection pool.

Connection Pool

The connection pool is an object in the Physical layer, it contains information about the connection between the Oracle BI Server and that data source.

The Physical layer in the Administration Tool contains at least one connection pool for each database. When you create the physical layer by importing a schema for a data source, the connection pool is created automatically.

You can configure multiple connection pools for a database.It is recommended that you create a dedicated connection pool for initialization blocks.

About Connection Pools for Initialization Blocks
It is recommended that you create a dedicated connection pool for initialization blocks. This connection pool should not be used for queries.
Additionally, it is recommended that you isolate the connections pools for different types of initialization blocks. This also makes sure that authentication and login-specific initialization blocks do not slow down the login process. The following types should have separate connection pools:
  • All Authentication and login-specific initialization blocks.
  • All initialization blocks that set session variables.
  • All initialization blocks that set repository variables. 

Setting Up General Properties For Connection Pools

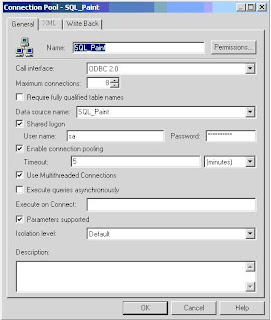
Name : We can set any appropriate name for the connection pool based on its usage. Usage in the sense, there may be multiple connection pools for session variables, repository variables, authentication and log in purpose.

Call Interface : specify the interface through which you want the application to communicate with underlying database.To communicate with oracle databases select either odbc or native call interfaces (oci 8i/9i, oci 10g/11g). 
  • when a odbc is selected "Data source name:" is the name of the System DSN in odbc data source administrator. 
  • when a oci call interface is selected "Data source name:" is the TNS Name in the tnsnames.ora file.
3. Maximum Connections: This parameter specifies the maximum number of concurrent connections allowed.
The default is 10.
For each connection pool, you must specify the maximum number of concurrent connections allowed. After this limit is reached, the Oracle BI Server routes all other connection requests to another connection pool or, if no other connection pools exist, the connection request waits until a connection becomes available.
Increasing the allowed number of concurrent connections can potentially increase the load on the underlying database accessed by the connection pool. Test and consult with your DBA to make sure the data source can handle the number of connections specified in the connection pool. 
In addition to the potential load  associated with the database resources, the Oracle BI Server allocates shared memory for each connection upon server startup. This raises the number of connections and increases Oracle BI Server memory usage.


Make sure the “Max Connections” parameter on your connection pools are appropriately set (not too
low….not too high!).    If in doubt, you can use the following formula which assumes that no more
than 4% of your users will ever be logged on and running a report at any one moment:

Max Connections =   Total Users   *   0.04   *    Max Reports on a Dashboard

So if you have 1000 users and you have no more than 4 reports on any one dashboard, then your
“Max Connections” should be set to 160.

Require fully qualified table names : Select this check box, if the database requires it. When this option is selected, all requests sent from the connection pool use fully qualified names to query the underlying database.
Eg: Assume that, there is a table called Emp in Physical Layer, which has imported from a default schema dbo of the database OLE.
  • When we check the option Require fully qualified table names for connection pool, then the requests will contain the full qualified table name like - OLE.dbo.Emp.                                                                                                                                                select ename from OLE.dbo.Emp
  • When we uncheck the option Require fully qualified table names for connection pool, then the requests will contain only table name itself like - Emp.                                                                                    select ename from Emp

Data source name : The drop-down list shows the System DSNs configured on your system. A data source name that is configured to access the database to which you want to connect. The data source name needs to contain valid log on information for a data source. If the information is invalid, the database log on specified in the DSN will fail. 

Shared logon :  Select the Shared logon check box if you want all users whose queries use the connection pool to access the underlying database using the same user name and password.
If this option is selected, then all connections to the database that use the connection pool will use the user name and password specified in the connection pool, even if the user has specified a database user name and password in the DSN (or in user configuration).
If this option is not selected, connections through the connection pool use the database user ID and password specified in the DSN or in the user profile.
 
Enable connection pooling :  Allows a single database connection to remain open for the specified time for use by future query requests. Connection pooling saves the overhead of opening and closing a new connection for every query. If you do not select this option, each query sent to the database opens a new connection.

  Timeout (Minutes) : Specifies the amount of time, in minutes, that a connection to the data source will remain open after a request completes. During this time, new requests use this connection rather than open a new one. The time is reset after each completed connection request.

If you set the timeout to 0, connection pooling is disabled; that is, each connection to the data source terminates immediately when the request completes. Any new connections either use another connection pool or open a new connection.


Monday, August 13, 2012

How to check Session Variable's value in Administration Tool ?

We can check the session related information in Administration Tool using an option called, Session Manager.
Manage--> Session.
In Session Manager, we can find two section,
 the first section shows all the users who have logged in, 
the second section has two tabs, Requests and Variables.
Requests :  The Requests tab shows all the requests issued by the user(the user which is selected in the first section of the Session Manager.)


Variables : The Variables tab shows all the variables and their values assigned for that user session.


Friday, August 10, 2012

Alias Table in OBIEE

Alias table means it is a reference table for the physical Table. When you create any alias table, then the alias table will inherit all the properties of the physical table.

We can not modify the alias table properties, like
1. can not rename the column name.
2. Can not change the  column data type .
3. Can not delete the columns

But we can only change the alias table name according to our naming convention.

Steps to create Alias table :
1. Right click on the physical table, New Object -->Alias
2. Give the name for alias table. Then click on OK.

Advantages of Alias Table :
1. OBIEE does not support Circular join in BMM layer, so we can overcome from this problem by creating alias table for one of the table in that circular join.

2. OBIEE does not support self join, so we can overcome from this problem by creating alias table.

3. If a fact table having relationship with dimention table on more than one key, then we can create aliases for the dimension talbe, then we can join fact table to these alias table on different keys.
Eg : consider, there is a order table, it has two columns in that, namely, order_date and required_date, both columns have to be joined to the Time dimension. In such situation we can create alias for the Time dimension, like Order_Date_dim and Required_date_dim. Now join the order table to these tables on different keys.


Wednesday, July 4, 2012

Direct Database Request in OBIEE

This property allows users to execute physical queries directly from Presentation Services.

The users can execute the following Statements in Direct Database Request from Presentation Services directly : 
SELECT
INSERT
DELETE
DROP
UPDATE
PROCEDURE - users can create procedures from Presentation Services.
TRIGGER etc.
How to use this Property ?
[The below steps are written with the assumption of all the privileges are set to the user. If you stuck in any of the following steps, see the Necessary Privileges section in the same post.]

Step 1 : In Answers, Click on Create Direct Request under Direct Database Request.
Step 2 : In Connection Pool Section, write the correct connection pool name.
            [You can get the connection pool name from Administration Tool. Read More].
            In SQL Statement Section, write the SQL.
            Then click on Validate SQL and Retrieve Columns button.          
            There you can see the column list in Result Section.

Then click on Results Tab to see the Results.
Necessary Privileges :
Necessary Privileges, a user should have to use the direct Database Request are as follows :
  • Edit Direct Database Requests
  • Execute Direct Database Requests
Edit Direct Database Requests
If the user does not have Direct Database Request  privileges, then the Direct Database Request section will not be showed in Answers for such user.
To set the Direct Database Request privilege to any user follow the below steps :
Step 1 : Go to Settings > Administration

Step 2 : In Oracle BI Presentation Services Administration window, then locate Manage Privileges  and click           on it.

Step 3 : In the Privilege Administration window, go to Answers section, locate Edit Direct Database Requests, then click on the link.

Step 4 : In Change Privilege Permissions window,  Choose the user to which you want to grant permission, then click on Add.

Step 5 : Now Log in as a user to which you just granted permission and check that Direct Database Request section will be appear for that user in Answers.
Execute Direct Database Requests
In the Privilege Administration window (to open Privilege Administration window,just refer the above steps), go to Answers section, locate Execute Direct Database Requests and grant the this privilege to the desired user.


And one more thing you should do is, go to Administration Tool, grant the Execute Direct Database Requests permission to that user.
To grant Execute Direct Database Requests permission in Administration Tool, follow the below steps.
1. Open Administration Tool, Go to Manage > Security
2. Select the user/ group from left pane of Security Manager window.
3. Double click on the user/ group name.
4. Click on Permission,.
5. In User/Group Permissions window, go to Execute Direct Database Request and select Allow.
6. Click OK.

Note :  If configured incorrectly, it can expose sensitive data to an unintended audience.

How to get the Connection Pool name ?

Open Administration Tool.


In Physical Layer, Expand the Database, then double click on the Connection Pool.

In Connection Pool Window, you can see the name.

Thursday, June 28, 2012

Server Configuration and Tuning


Some important considerations for improving query performance with the Oracle BI Server.

NQSConfig.INI File Parameters
The NQSConfig.INI file contains configuration and tuning parameters for the Oracle BI Server. There are parameters to configure disk space for temporary storage, set sort memory buffer sizes, set cache memory buffers, set virtual table page sizes, and a number of other configuration settings that allow you to take full advantage of your hardware’s capabilities.

Aggregate Tables
You should use aggregate tables to improve query performance. Aggregate tables contains precalculated summarizations of data. It is much faster to retrieve an answer from an aggregate table than to recompute the answer from thousands of rows of detail. The Oracle BI Server uses aggregate tables automatically, if they have been properly specified in the repository.

Query Caching
Enabling query caching causes the Oracle BI Server to store query results for reuse by subsequent queries. Caching can dramatically improve the apparent performance of the system for users. Read More on Cache >>

Tune and Index Underlying Databases
The Oracle BI Server sends queries to databases. For the queries to return in a timely manner, the underlying databases need to be configured, tuned, and indexed correctly. If there are queries that return slowly from the underlying databases, you can capture the SQL of the queries in the query log, then provide them to the DBA for analysis.

Purging Cache


Purging cache is the process of deleting entries from the query cache. You can purge cache entries
in the following ways:

1. Manually, using the Administration Tool Cache Manager facility (in online mode).
2. Automatically, by setting the Cache Persistence Time field in the Physical Table dialog box for a particular       table.
3. Automatically, by setting up an Oracle BI Server Event Polling Table.
4. Automatically, as the cache storage space fills up.
5. Using the ODBC functions.

How Cache System handles Making Changes to a Repository


When you modify an Oracle BI repository in online mode, any changes you make that will affect cache entries automatically result in a purge of all cache entries that reference the changed objects. The purge occurs when you check in the changes. For example, if you delete a physical table from a repository, all cache entries that reference that table are purged upon check in. Any changes made to a business model in the Business Model and Mapping layer will purge all cache entries for that 
business model.

Online Mode
When you modify an Oracle BI repository in online mode, any changes you make that will affect cache entries automatically result in a purge of all cache entries that reference the changed objects. The purge occurs when you check in the changes.
For example,
1. If you delete a physical table from a repository, all cache entries that reference that table are purged upon check in.
2. Any changes made to a business model in the Business Model and Mapping layer will purge all cache entries for that business model.

Note : In Business Model, if you made any changes like deleting any logical column, renaming a logical column etc. will result in purge of all cache entries for that business model automatically.

Offline Mode
When you modify an Oracle BI repository in offline mode, you might make changes that affect queries stored in the cache and render those cached results obsolete. Because the repository is not loaded by the server during offline mode edits, the server has no way of determining if the changes made affect any cached entries. The server therefore does not automatically purge the cache after offline changes. If you do not purge the cache, there might be invalid entries when the repository is next loaded. Unless you are sure that there are no entries in the cache that are affected by your offline changes, you should purge the cache for any business model you have modified.

Switching Between Repositories
If you intend to remove a repository from the configuration of the Oracle BI Server, make sure to purge the cache of all cache entries that reference the repository. Failure to do so will result in a corrupted cache.

Friday, June 22, 2012

Best Practices for Cache in OBIEE


Disk Space
The query cache requires dedicated disk space. How much space depends on the query volume, the size of the query result sets, and how much disk space you choose to allocate to the cache. For performance purposes, a disk should be used exclusively for caching, and it should be a high performance, high reliability type of disk system.

Administrative Tasks
There are a few administrative tasks associated with caching. You need to set the cache persistence time for each physical table appropriately, knowing how often data in that table is updated. When the frequency of the update varies, you need to keep track of when changes occur and purge the cache manually when necessary. You can also create a cache event polling table and modify applications to update the polling table when changes to the databases occur, making the system event-driven.
The Oracle BI Server also provides ODBC-extension functions for purging cache entries

programmatically. You can write your own scripts to call these functions at the appropriate times.

The ODBC functions are :
SAPurgeCacheByQuery()
SAPurgeCacheByTable()
SAPurgeCacheByDatabase()
SAPurgeAllCache()

Keeping the Cache Up To Date
If the cache entries are not purged when the data in the underlying databases changes, queries
can potentially return results that are out of date. You need to evaluate whether this is acceptable. It might be acceptable to allow the cache to contain some stale data. You need to decide what level of stale data is acceptable and then set up (and follow) a set of rules to reflect those levels.

For example, suppose your application analyzes corporate data from a large conglomerate, and you are performing yearly summaries of the different divisions in the company. New data is not going to materially affect your queries because the new data will only affect next year’s summaries. In this case, the tradeoffs for deciding whether to purge the cache might favor leaving the entries in the cache.

Suppose, however, that your databases are updated three times a day and you are performing
queries on the current day’s activities. In this case, you will need to purge the cache much more
often, or perhaps consider not using it at all.

Whatever your situation, you need to evaluate what is acceptable as far as having noncurrent
information returned to the users.


Caches in OBIEE

Main Caches in OBIEE : 
Other Caches in OBIEE : 
  • QUERY_PLAN
  • DRILLDOWN_INFO
  • DRILLDOWN_QUERY
  • session variable via a INIT_BLOCK
Session variable
If you use the row-wise initialization, the result of the query can be cached in the main memory

cache of OBIEE server.

.

Query Cache in OBIEE


The Oracle BI Server can save the results of a query in cache files and then reuse those results later when a similar query is requested. So, for any query request, the database processing is required only once, not every time the query is run.

When a user requests any query, BI Presentation Server generates Logical Query and handover it to the BI server.[Before handover the Logical SQL to BI Server, the Presentation Server checks the Presentation Server cache for similar Logical SQL. If found, the Presentation Server will get the result from that cache and return to the user without contacting the BI Server. Read more...] Then, the BI Server checks the disk-based cache of query result sets (query  cache). If the similar query and its result set are stored in query cache, then BI Server will retrieve the data from the query cache and return it to the Presentation Server. So, the use of cache saves database processing, processing time, and the query response time will be fast.

Advantages of Cache in OBIEE :
Dramatic improvement of query performance : BI Server stores the query results in local cache. The similar subsequent queries can use those results. So, the BI Server does not have to access the backend database. This improves the query performance.

Less network traffic and Reduction in database processing: If the result of a query is stored in a cache, then the result for a similar subsequent queries do not have to come over the network to the BI Server. Not running the query on the database frees the database server to do other work. If the database uses a charge back system, it could save money in the budget as well.

Reduction in Oracle BI Server processing overhead : Another benefit of using the cache to answer a query is savings in processing time on the Oracle BI Server, especially if the query results are retrieved from multiple databases. Depending on the query, there might be considerable join and sort processing in the server. If the query is already calculated, this processing is avoided, freeing server resources for other tasks.

Tip : If there are more than one source tables(those tables may be resides in different sources) for a query, then BI Server will generate separate physical queries and send them to the corresponding databases and get the results. When the BI Server gets the result set, it has to do the appropriate joins and handover it Presentation Server. 

Presentation Server Cache in OBIEE

Presentation Server  has its own cache, stores the result set of queries in that cache. When the user requests any query, and if the query is similar to the one which is stored in cache memory, then the Presentation Server will retrieve the result for this query  from the cache and return the result to the user without contacting the BI Server. This improves the query response time, eliminates BI server processing time.

The files for the Presentation Services cache:
  • Have names such as nQS_xxxx_x_xxxxxx.TMP.
  • Are stored in the following directory:
         C:\OracleBIData\tmp
Refer the following link to know more about the presentation cache : 

Thursday, June 21, 2012

Restrict the Number of Rows Per Page in Table View

By default, 25 rows will be displayed per page in a table view.

If you want to display more or less than 25 rows per page, you need to edit the table view properties.
Follow the below steps :
1. Click on Edit view of table view.

2. Click on Table Properties, then enter the value for Rows Per Page option in Edit view window.
3. Click on OK and check the result.

To see all the rows, click on "arrow star button", then all the rows will be displayed at a time.

Restict Number of Row for Table View in OBIEE

OBIEE Presentation server provides an ability to restrict the number of rows to be displayed in table view.

The Administrator can set the number of rows to be displayed in table view by configuring the InstanceConfig.xml file.  

Assume that, a table called Emp_Olem consists of 1000 rows, by default all the rows will be display in table view. Administrator can restrict to 10 (or any number he can specify ) rows. 
Below are the steps to achieve this :
1. Open instanceconfig.xml file.
2. Locate <ResultRowLimit >  tag and define the number of rows to be displayed.
         <ResultRowLimit >10</ResultRowLimit >
     If the above tag is not there in your config file, then add it.
        <ServerInstance>
             <ResultRowLimit >10</ResultRowLimit >
        <ServerInstance>
     
 3. Save the file and restart the Presentation Server.
 4. Now, check the result.
Drag some logical columns into Answers then click on Results.
Only ten rows are displaying even though the table having 1000 rows. But in Pivote Table, all the rows will be display. This applies only to table view.

Note : BI server retries all the rows, ie 1000 rows from the database but display only ten 10 rows in table view.

We can also configure number of rows to be display per page. To read about this click here.

Tuesday, June 19, 2012

Level Based Measure in OBIEE


A level-based measure is a column whose values are always calculated to a specific level of  aggregation. For example, a company might want to measure its revenue based on the country, based on the region, and based on the city. You can set up columns to measure CountryRevenue, RegionRevenue, and CityRevenue.

To set up these calculations, you need to build a dimensional hierarchy in your repository that contains the levels Grandtotal, Country, Region, and City. This hierarchy will contain the metadata that defines a one-to-many relationship between Country and Region and a one-to-many relationship between Region and City. For each country, there are many regions but each region is in only one country. Similarly, for each region, there are many cities but each city is in only one region.


Next, you need to create the logical column CountryRevenue in fact table  in BMM layer.
Right click on the fact table -> New Object -> Logical Column.

Then, Give a name to the measure, then under Aggregation tab, select the appropriate aggregation rule(SUM is the Aggregation for the measure CountryRevenue, in my case), then under the Level tab, select the appropriate logical level (country is the logical level for the measure CountryRevenue, in my case). Then say OK.


Repeat the same process for the other tow measures (RegionRevenue, and CityRevenue).

Now map the these logical measures to the physical source (Revenue is the physical source for these measures in my case.) To map the column CountryRevenue to the physical source column Revenue, follow the below steps :
Double click on the measure, called CountryRevenue, goto Data Type.You will find the logical Table source, double click on it.

Uncheck the option Show Mapped Columns, then all the unmapped columns will be displayed. In our case CountryRevenue,RegionRevenue, and CityRevenue are the unmapped columns. So, you should be able see all these columns there.

Now click on the dotted button (highligted in above picture) beside the measure CountryRevenue to map to physical source column. Then select the appropriate phisical source column from the Expression Builder and say OK.

Repeat the same procedure for other two columns.

Final step is, make sure that all the three measures should be listed under the corresponding logical Level in the dimension. In my case, the CoutryRevenue must listed under Country logical level, RegionRevenue must listed under Region logical level, CityRevenue must listed under City logical level in the dimension Product.


These measures are specific to the defined logical level. So CountryRevenue measure will always gives us the Revenue to the Country level, even if you add the Region dimension column in between Country and CountryRevenue  columns. RegionRevenue measure will always gives us the Revenue to the Country level, even if you add the City dimension column in between Region and RegionRevenue  columns.CityRevenue measure will always gives us the Revenue to the City level.

Thank you,